Kitchen backsplash DIY: Transform your space easily
Advertisement

Are you ready to revamp your kitchen? A kitchen backsplash DIY project is an affordable and rewarding way to elevate your cooking space. Whether you’re a seasoned DIYer or just starting out, this is a fantastic opportunity to personalize your kitchen.
From choosing the right materials to mastering the installation process, a kitchen backsplash DIY can completely change the look and feel of your kitchen.
With proper planning and execution, you can create a stylish and functional backsplash that reflects your unique taste and makes your kitchen stand out. Let’s dive into how you can make your kitchen backsplash DIY project a success!
Choosing the Right Materials for Your Kitchen Backsplash DIY
When starting your kitchen backsplash DIY project, selecting the right materials is essential for achieving both style and functionality.
Advertisement
The materials you choose will influence not just the look of your kitchen, but also its long-term durability and ease of maintenance. Here’s a comprehensive guide to help you pick the best materials for your kitchen backsplash DIY project.
Popular Materials for Backsplashes
There are several materials that are commonly used for kitchen backsplashes, each with its own set of benefits and aesthetic appeal.
Understanding the unique qualities of each option can help you make a more informed decision for your kitchen backsplash DIY.
Advertisement
- Tile: One of the most popular choices, tile is available in an endless variety of colors, sizes, and patterns. It is incredibly durable, easy to clean, and offers versatility in design. Whether you prefer classic subway tiles, intricate mosaics, or contemporary geometric patterns, tile can suit any style.
- Glass: Glass backsplashes create a sleek, modern look and can help make a small kitchen feel brighter by reflecting light. They are available in clear, frosted, or back-painted varieties and are easy to clean, making them a great option for those who cook often.
- Metal: For a modern, industrial aesthetic, metal backsplashes like stainless steel or aluminum can add a polished look to your kitchen. Metal is heat-resistant, durable, and simple to wipe down, making it ideal for a high-functioning kitchen.
- Natural Stone: Materials like granite, marble, and slate offer a luxurious, high-end look. While natural stone brings elegance and uniqueness, it does require more maintenance to keep it pristine, including regular sealing to protect it from stains and moisture.
Each material offers a distinct set of benefits. If you’re aiming for a bold, statement-making backsplash DIY, ceramic tiles with vibrant patterns are a great choice.
On the other hand, if you prefer a subtle and modern look, a glass backsplash may be a better fit for your kitchen backsplash DIY.
Considerations for Material Selection
Choosing the perfect material for your kitchen backsplash DIY requires thoughtful consideration of both your lifestyle and kitchen design.
Think about how the material will fit into the overall design scheme and how well it will stand up to daily use.
Cooking Habits
If you’re a regular cook, look for materials that are easy to clean and can withstand heat and spills. Materials like ceramic tiles, stainless steel, and glass are excellent choices for busy kitchens.
Family-Friendly Durability
If you have kids or expect heavy traffic in the kitchen, prioritize materials like porcelain or ceramic tiles, which are more durable and easier to maintain. These options will handle the wear and tear of everyday life.
Kitchen Style and Color Scheme
Your backsplash should complement the existing design elements in your kitchen. For example, if your kitchen features dark cabinets or countertops, a lighter-colored backsplash can create a striking contrast.
Conversely, if your kitchen is light and airy, a darker backsplash can add depth and drama.
By selecting the right materials for your kitchen backsplash DIY project, you’ll not only enhance the look of your kitchen but also ensure that it meets your functional needs.
Take your time to consider how each material will fit into your daily routine and aesthetic vision.
Step-by-Step Guide to Installing Your Kitchen Backsplash DIY
Installing your own kitchen backsplash DIY can be a rewarding and transformative project.
By following the proper steps and using the right tools and materials, you can achieve a professional-looking finish that enhances the style of your kitchen.
Here’s an in-depth, step-by-step guide to help you through the process from start to finish.
Gather Your Tools and Materials
Before beginning your kitchen backsplash DIY project, it’s crucial to have all the necessary tools and materials on hand. Organizing everything beforehand will save you time and help ensure a smooth installation process.
Here’s a checklist to get you started:
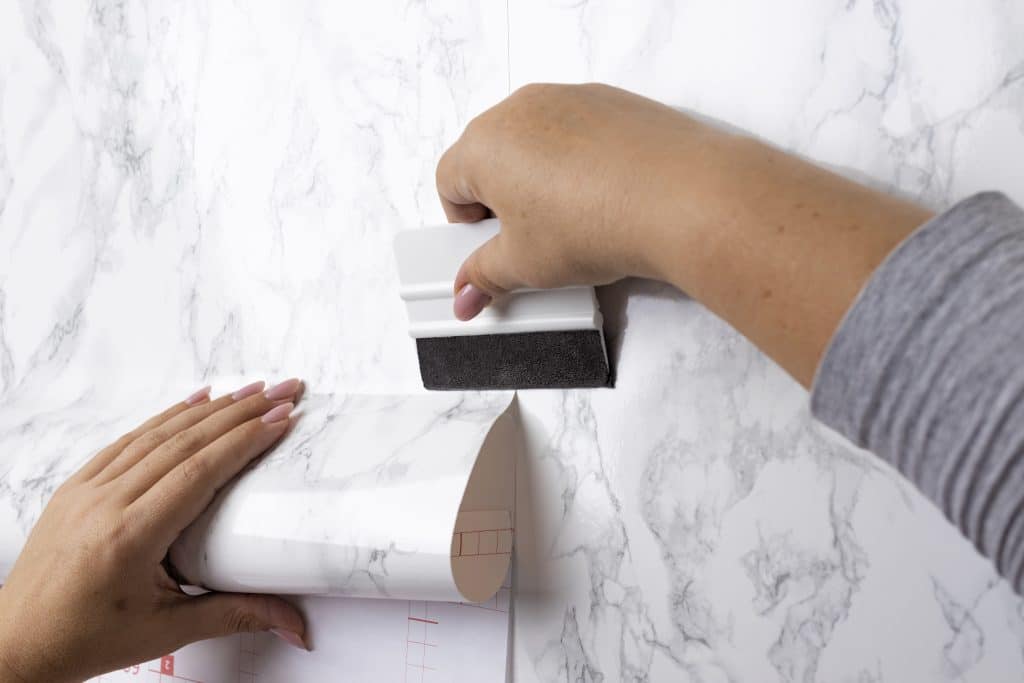
- Tiles: Select the material that best fits your design vision, such as ceramic, glass, or natural stone.
- Thin-set Mortar: This adhesive will bond the tiles to the wall.
- Grout: Fills the spaces between tiles for a finished look.
- Tile Cutter: Used to trim tiles to fit around edges, corners, or outlets.
Additionally, make sure to have spacers, a grout float, a sponge, and safety goggles. Having everything organized and accessible will streamline the process, making it easier and more efficient.
Prepare the Wall Surface
For successful tile adhesion in your kitchen backsplash DIY, start with a clean, smooth surface. This ensures the thin-set mortar adheres properly and prevents tiles from shifting.
- Remove Old Materials: Begin by removing any existing backsplash, wallpaper, or peeling paint.
- Clean the Wall: Wash the wall thoroughly with soap and water to remove grease, dust, and debris. Allow it to dry completely before moving forward.
- Apply Primer: If your wall is porous or uneven, applying a primer helps the mortar bond more effectively to the surface, ensuring better tile adhesion.
This prep work is crucial for the longevity of your kitchen backsplash DIY, as it ensures the materials will stick and stay intact.
Apply Thin-set Mortar
Now that your wall is prepped, it’s time to apply the thin-set mortar. This will hold your tiles in place.
- Spread Mortar: Use a notched trowel to spread the mortar over a small section of the wall. Start at the bottom and work your way up. Apply just enough mortar to set the tiles without it drying out before you place them.
- Create Grooves: Use the notched edge of the trowel to create grooves in the mortar. This helps the tiles adhere securely and ensures a uniform installation.
Applying the right amount of mortar is key to a strong, lasting bond for your kitchen backsplash DIY.
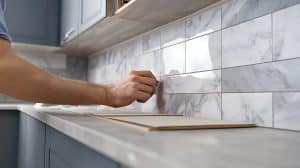
Place the Tiles
Once the mortar is ready, begin placing your tiles carefully:
- Start at the Bottom: Press each tile firmly into the mortar, starting at the bottom. Ensure you place tiles with equal spacing using tile spacers. This helps maintain consistent gaps between tiles for grouting later.
- Check Alignment: Regularly check your tiles with a level to make sure they are aligned and straight.
- Trim Tiles: If necessary, cut tiles to fit around outlets or corners. A tile cutter or wet saw is perfect for this task.
After all the tiles are placed, allow the mortar to cure for the recommended time, according to the manufacturer’s instructions. This ensures the tiles are properly secured before you move on to the next step.
Grouting Your Backsplash
Once the mortar has fully dried, it’s time to grout:
- Remove Spacers: Take out the tile spacers carefully.
- Mix the Grout: Follow the manufacturer’s instructions to mix your grout to the correct consistency.
- Apply Grout: Using a grout float, apply the grout at a diagonal angle to fill the spaces between tiles. Be sure to press the grout firmly into the gaps for complete coverage.
- Clean Excess Grout: After applying grout, use a damp sponge to clean off any excess grout from the tiles. Be careful not to disturb the grout lines while doing so.
- Allow to Dry: Let the grout set for the recommended time before wiping down the tiles with a clean, dry cloth.
Seal the Grout Lines
After the grout has set, you may want to seal the grout lines, especially if your backsplash is made from porous materials. This step protects the grout from moisture and stains, prolonging the life of your kitchen backsplash DIY.
-
Apply Grout Sealer: If necessary, apply a grout sealer following the product instructions. This helps keep your backsplash looking fresh and makes cleaning easier in the future.
By following these detailed steps, you’ll be able to successfully complete your kitchen backsplash DIY and enjoy a beautiful, functional space for years to come!
Creative Design Ideas for Your Kitchen Backsplash DIY Inspiration
If you’re looking to inject some personality and creativity into your kitchen, your kitchen backsplash DIY is the perfect place to do so. The backsplash can be a standout feature that ties the whole room together.
With countless design options available, you can easily find a style that complements your vision. Let’s explore some innovative and creative ideas to inspire your kitchen backsplash DIY project.
Colorful Patterns to Energize Your Kitchen
One of the easiest ways to add character to your kitchen is by incorporating colorful patterns into your kitchen backsplash DIY. Bright tiles and bold designs can serve as the focal point of your space.
Whether you prefer geometric shapes, abstract motifs, or traditional patterns, colorful tiles bring vibrancy and energy to any kitchen.
Mosaic Tiles
Create intricate designs with small pieces of tile to make a bold statement. Mosaics offer endless possibilities for artistic patterns and color combinations, making them a great choice for those who want a unique, eye-catching backsplash.
Chevron Patterns
Using V-shaped tiles arranged in a zigzag pattern brings a modern touch to your backsplash. The angular design adds dynamic movement to your kitchen and works well with both contemporary and traditional interiors.
Color Blocks
Alternate bold colors to create a visually stimulating effect. Color-blocked tiles can add a sense of order and structure while allowing you to play with different hues and textures.
By choosing colorful patterns, you can turn your kitchen backsplash DIY into a dynamic and fun feature that energizes your kitchen’s design.
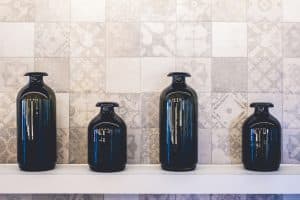
Natural Materials for a Timeless, Elegant Look
For a more sophisticated and timeless look, consider incorporating natural materials into your kitchen backsplash DIY. Natural stone offers unique patterns that give your space a luxurious and organic feel, adding warmth and character.
- Marble: Known for its elegance, marble tiles bring luxury and a polished finish to your kitchen. Each marble tile has a distinct pattern, which makes your backsplash truly one-of-a-kind.
- Slate: A darker stone with a textured surface, slate can provide a more rustic, yet refined, appearance. It’s durable and adds an earthy charm to your kitchen.
- Granite: Highly durable and available in a variety of finishes, granite offers a more structured and sleek appearance. It’s perfect for creating a modern and high-end look in your kitchen.
In addition to stone, wood can be an excellent option for creating a rustic or country-style backsplash. Although wood requires more maintenance, it adds warmth and an inviting atmosphere when properly treated.
Glass Backsplashes for a Sleek, Modern Look
For those seeking a more contemporary, minimalistic design, glass backsplashes offer a sleek and modern aesthetic. The reflective surface can make your kitchen feel brighter and more spacious, creating a clean and airy atmosphere.
- Clear Glass: A timeless option, clear glass provides a simple, minimalist look that blends seamlessly with almost any kitchen style.
- Frosted Glass: For a more subtle touch, frosted glass offers a soft and diffused light effect while maintaining a modern appeal.
- Back-painted Glass: Add a pop of color behind your glass backsplash to introduce bold hues and enhance your kitchen’s color scheme.
- Glass backsplashes are not only stylish but also easy to clean, making them an ideal choice for kitchens where practicality and design go hand-in-hand.
Subway Tiles with a Creative Twist
While subway tiles are a classic and popular choice for backsplashes, you can elevate their design by experimenting with different layouts, orientations, and grout colors.
This allows you to put a modern spin on a timeless look, making your kitchen backsplash DIY feel fresh and personalized.
Herringbone Layout
A modern twist on traditional subway tiles, a herringbone pattern adds elegance and complexity to the backsplash, creating a more dynamic visual effect.
Stacked Layout
Instead of the typical brick pattern, stack your tiles vertically or horizontally for a sleek, contemporary design.
Varying Grout Colors
Play with contrasting grout colors to highlight the tiles and add depth to your design. Dark grout against light tiles or vice versa can create a stunning visual contrast.
To add even more interest, consider mixing different tile sizes or materials within the same area. This allows you to create a truly unique backsplash that reflects your personal style.
Final Thoughts
When designing your kitchen backsplash DIY, think about what best reflects your personal taste and complements the rest of your kitchen. Whether you prefer bold patterns, natural stone, or sleek glass, the possibilities are endless.
A well-designed backsplash not only enhances the aesthetic appeal of your kitchen but also adds a layer of functionality. Let your creativity guide you, and transform your kitchen with a backsplash that suits both your style and needs.
Tips for Maintenance and Cleaning of Your Kitchen Backsplash DIY
Maintaining and cleaning your kitchen backsplash DIY is essential to keep it looking fresh and beautiful over time. Regular care not only enhances the visual appeal of your backsplash but also extends its lifespan.
Here are some valuable tips to help you keep your kitchen backsplash DIY in top condition, ensuring it remains a standout feature in your kitchen for years to come.
Regular Cleaning
One of the easiest ways to maintain your kitchen backsplash DIY is by establishing a routine cleaning schedule. Regular cleaning can prevent buildup of grease, food splatters, and dust, keeping your backsplash looking new.
Here’s how to effectively clean your backsplash:
Use Warm, Soapy Water
For most backsplashes, a simple solution of warm water and mild dish soap is enough to clean surfaces. This gentle approach prevents damage while effectively removing daily grime.
Avoid Abrasive Scrubbers
While it may be tempting to scrub tough stains, abrasive scrubbers can scratch the surface of tiles or glass, leaving permanent marks. Opt for soft cloths or sponges instead.
Dry with a Soft Cloth
After cleaning, dry your backsplash with a soft cloth to prevent water spots or streaks. This also helps maintain its shine, especially on glass or glossy tiles.
By following a regular cleaning routine, you’ll preserve the beauty of your kitchen backsplash DIY and prevent the buildup of dirt and stains.
Addressing Stains
Stains are inevitable, especially in a kitchen where food and liquids are constantly present. The sooner you address stains, the easier they will be to remove, keeping your kitchen backsplash DIY looking spotless.
- Grease Stains: Greasy stains from cooking can be tough to remove. A mixture of baking soda and water works wonders for greasy spots. Apply the paste directly to the stain, let it sit for a few minutes, and then wipe it away with a damp cloth.
- Grout Stains: Grout can discolor over time, especially in areas that are frequently exposed to moisture. To clean grout, use a dedicated grout cleaner or a homemade solution of vinegar and baking soda. Scrub gently with a soft brush or sponge to avoid damaging the grout lines.
By addressing stains promptly, you can prevent them from setting and maintain a fresh, clean look for your kitchen backsplash DIY.
Sealing and Protecting Your Backsplash
Certain materials, especially natural stone tiles, require extra care to protect them from moisture and stains. Sealing your backsplash can help preserve its integrity and extend its lifespan.
Tiles like granite, marble, and slate are porous and can absorb stains if not sealed. Check with the manufacturer for recommendations on how often to apply a new coat of sealant.
Typically, you should seal natural stone tiles once every 1-2 years to protect against water damage. If you have a glass backsplash DIY, consider applying a protective spray.
This spray helps repel water and prevents the buildup of grease, making it easier to clean your glass backsplash and keep it looking pristine.
Regular sealing and protective treatments ensure that your kitchen backsplash DIY remains durable and functional, preventing long-term damage from moisture and stains.
By following these simple maintenance and cleaning tips, you can ensure that your kitchen backsplash DIY continues to look stunning and serves its purpose for years to come.
Common mistakes to avoid during DIY backsplash projects
Engaging in a DIY backsplash project can be exciting, but there are common mistakes to watch out for. Understanding these pitfalls can save you time and money in the long run.
Here are some key errors to avoid to ensure a successful installation.
Poor Planning
One major mistake is skipping the planning stage. It’s essential to measure your space accurately and calculate the amount of materials needed. Failing to do this can lead to having too little or too much, both of which can complicate your project.
- Measure multiple times: Use a level to ensure your areas are straight.
- Create a layout plan: Knowing your design in advance helps with tile placement.
- Calculate materials: Over-purchasing or under-purchasing materials is a waste of resources.
Ignoring Surface Preparation
Another common error is not preparing the wall surface properly. A clean and smooth surface is vital for good adhesion. Make sure to remove any old backsplash or grime. A well-prepped surface can prevent future issues, such as peeling or cracking.
Ensure you use a primer if necessary, especially if your wall is painted or porous. This helps the adhesive stick better to the surface.
Not Allowing for Drying Time
Impatience can lead to mistakes. After applying tile adhesive or grout, make sure to allow the necessary drying time as specified by the manufacturer. Rushing this process can result in tiles shifting out of place or grout not setting properly.
Be sure to read product instructions carefully to know how long you should wait before proceeding to the next step.
Skipping Sealing
Many DIYers forget to seal their grout or natural stone tiles after installation. This oversight can lead to stains and water damage over time. Sealing creates a protective barrier against moisture and makes cleaning easier.
Apply sealant as recommended, typically after the grout has fully cured. Regularly check for wear and reapply as necessary to protect your backsplash.
By avoiding these common mistakes, you can enjoy a visually stunning and functional kitchen backsplash. Plan carefully, prepare your surfaces well, be patient with drying times, and don’t forget to seal your work.
A kitchen backsplash DIY project can truly transform your kitchen, offering both aesthetic appeal and functionality.
By carefully selecting your materials, planning your layout, and following the right installation steps, you’ll be able to achieve a professional-quality result in no time.
Whether you’re opting for bold colors, timeless stone, or a sleek glass design, a kitchen backsplash DIY is an excellent way to personalize your space.
Remember to regularly clean and maintain your kitchen backsplash DIY to ensure it remains in top condition. With a little effort and the right tools, your kitchen backsplash DIY can stay beautiful for years to come.
Take your time, avoid common mistakes, and enjoy the process of creating a unique feature in your kitchen.
For more inspiration and expert tips, explore the following resources:
-
Mero Tile – Easy DIY Kitchen Backsplash Ideas
FAQ – Frequently Asked Questions About Kitchen Backsplash DIY
What materials are best for a kitchen backsplash?
Popular options include ceramic tiles, glass, natural stone, and metal. Each offers unique benefits suitable for various styles.
How do I prepare my wall for a backsplash installation?
Make sure to clean the surface thoroughly, remove any old materials, and apply primer if necessary for better adhesion.
What common mistakes should I avoid during the installation?
Avoid poor planning, skipping surface preparation, not allowing for drying time, and forgetting to seal grout.
How can I maintain my backsplash after installation?
Regularly clean the surface with warm soapy water, address stains promptly, and seal the grout as recommended to protect against moisture.
Liked the article?


